
[Compose] ui test 적용 및 트러블 슈팅
🔗 들어가며
weQuiz 프로젝트를 진행하며 다음의 코드에서 ui test의 필요성을 느끼게 되었다.
Button(
    modifier = Modifier.fillMaxWidth(),
    onClick = {
        if (isStartRealTimeQuizEnabled) {
            onStartRealTimeQuizButtonClick()
        } else if (isWaitingRealTimeQuizEnabled) {
            onWaitingRealTimeQuizButtonClick(true)
        }
    },
    enabled = isStartRealTimeQuizEnabled || isWaitingRealTimeQuizEnabled,
    colors = ButtonDefaults.buttonColors(
        containerColor = MaterialTheme.colorScheme.primary,
        disabledContainerColor = MaterialTheme.colorScheme.outlineVariant,
    ),
) {
    if (quiz.questions.isEmpty()) { // (참여자, 관리자) -> 문제가 없는 경우
        Text(text = stringResource(R.string.txt_quiz_question_count_zero))
    } else if (isOwnerBeforeQuizStart) { // (관리자) -> 퀴즈 시작 전
        Text(text = stringResource(R.string.txt_real_time_quiz_owner, quiz.waitingUsers.size))
    } else if (isParticipantBeforeQuizStart) { // (참여자) -> 퀴즈 시작 전
        Text(text = stringResource(R.string.txt_real_time_quiz_wait_false))
    } else if (isParticipantWaiting) { // (참여자) -> 대기 중
        Text(text = stringResource(R.string.txt_real_time_quiz_wait_true, quiz.waitingUsers.size))
    } else if (isProgress) { // (참여자, 관리자) -> 퀴즈 진행 중
        Text(text = stringResource(R.string.txt_real_time_quiz_progressing))
    } else if (quiz.isFinished) { // (참여자, 관리자) -> 퀴즈 종료
        Text(text = stringResource(R.string.txt_real_time_quiz_finished))
    }
}
위 코드에서도 확인할 수 있듯이 버튼 속 text가 여러 조건에 따라 다르게 보여져야 하는 상황이다. 기존에는 각 상황에 올바른 text가 보여지는지 확인하기 위해 직접 기기에서 특정 상황을 만들어 테스트를 진행하였다. 하지만 이러한 방식은 추후 새로운 조건이 추가 되었을 때 직접 해당하는 상황을 만들어 테스트를 진행해야 했기 때문에 테스트에 어려움이 존재하였다.
물론 간단한 상황에서는 preview를 적극적으로 활용할 수 있었다. 하지만 위와 같이 조건이 많을 경우, 모든 경우를 preview로 확인하는 것에는 어려움이 있을 뿐만 아니라, preview의 용도와도 맞지 않다는 생각이 들었다. 따라서 최종적으로 compose ui test를 적용해 특정 상황에서 ui가 올바르게 그려지는지 확인하는 작업을 진행하기로 하였다.
🔗 Compose UI Test 기본 지식 쌓기
안드로이드 공식 문서를 바탕으로 Compose UI Test와 관련된 부분을 학습하고 다음의 게시글을 통해 정리해 보았다.
- [Compose] ui test(1): compose ui test에서의 다양한 testing api와 semantic tree
- [Compose] ui test(2): synchronization 다루기 & ui test common pattern 살펴보기
🔗 트러블 슈팅
처음 적용하는 ui test에서 생각지도 못한 오류들을 마주하기도 하였다. 특히 다음의 화면을 테스트 하는 과정에서 크게 두 가지 오류를 만나게 되었다. 우선 테스트 하고자 했던 화면을 먼저 살펴보자!
| 객관식 문제 출제 화면 | 낱말 맞추기 문제 출제 화면 |
|---|---|
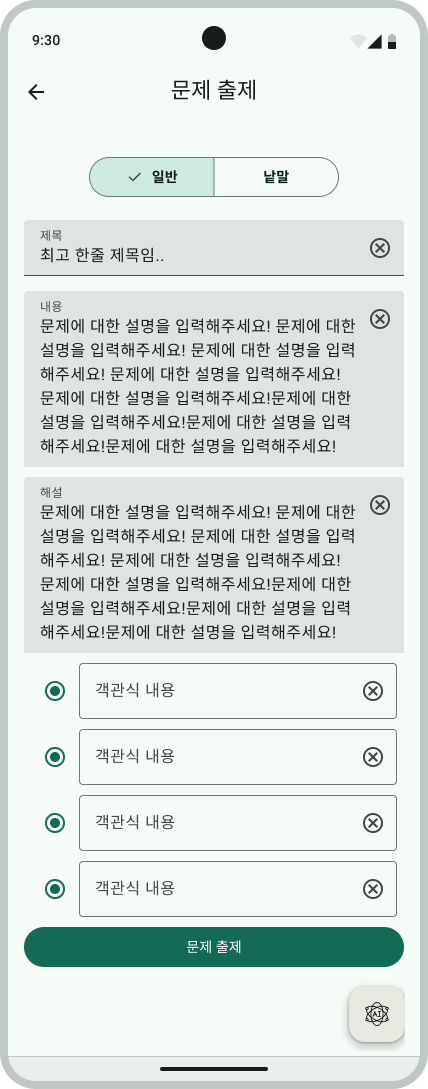 |
문제 생성 화면은 위와 같이 문제 유형(객관식 / 낱말 맞추기)에 따라 서로 다른 화면 구성을 가지게 된다. 객관식 문제를 생성할 때는 4지선다를 작성할 수 있고, 낱말 맞추기 문제를 생성할 때는 각각 최대 5개씩 빈칸 및 텍스트 요소를 추가해 문제를 구성할 수 있다.
트러블 슈팅 1) 원하지 않는 노드가 선택된다?🤔
우선 낱말 맞추기 화면에서 문제를 생성하기 위해서 제목이 필수로 입력되어야 하는 상황을 테스트하던 중이었다.
매 테스트마다 반복되는 setContent 로직은 다음과 같이 메소드로 분리해두고 사용하였다.
private fun setCreateQuestionScreen(uiState: CreateQuestionUiState) {
    composeTestRule.setContent {
        CreateQuestionScreen(
            uiState = uiState,
            onTitleChanged = {},
            onDescriptionChanged = {},
            onSolutionChanged = {},
            onNavigationButtonClick = {},
            onChoiceTextChanged = { _, _ -> },
            onSelectedChoiceNumChanged = {},
            onCreateQuestionButtonClick = {},
            onQuestionTypeIndexChange = {},
            onAddBlankItemButtonClick = {},
            onAddTextItemButtonClick = {},
            onBlankQuestionItemValueChanged = { _, _ -> },
            onContentRemove = {},
            onCreateBlankQuestionButtonClick = {},
            onShowDialog = {},
        )
    }
}
그리고 다음과 같이 title이 작성되지 않은 경우에 버튼이 비활성화 되는지 확인하는 테스트 코드를 작성하였다.
@Test
fun 낱말_맞추기_문제_생성_시_제목은_필수로_작성해야_한다() {
    val blankQuestionIndex = 1
    val newCreateQuestionUiState = baseCreateQuestionUiState.copy(
        selectedQuestionTypeIndex = blankQuestionIndex,
        choiceQuestionCreationInfo = baseChoiceQuestionCreationInfo.copy(
            title = "", // title을 작성하지 않을 경우
        ),
    )

    setCreateQuestionScreen(newCreateQuestionUiState)
    val buttonText = context.resources.getString(R.string.btn_create_question)
    composeTestRule.onNodeWithText(buttonText)
        .assertIsNotEnabled() // 문제 생성 버튼이 활성화 되지 않는다.
}
하지만 다음과 같은 오류가 발생하였다.
에러 발생!🚫
java.lang.AssertionError: Failed to assert the following: (is not enabled)
Reason: Expected exactly ‘1’ node but found ‘2’ nodes that satisfy: (Text + EditableText contains ‘Create Question’ (ignoreCase: false))
즉, 하나의 노드를 특정할 줄 알았던 조건이 여러 노드에 해당한다는 것이다. ui test를 디버그 하는 가장 대표적인 방법은 printLog()를 통해 semantic tree를 출력해보는 것이다. 나의 경우, 화면 상에서 설정한 텍스트를 동일하게 가지는 Node가 어디에 존재하는지 확인하기 위해 semantic tree를 출력해보았다.
|  |-Node #94 at (l=42.0, t=1671.0, r=1038.0, b=1776.0)px
|    Role = 'Button'
|    Text = '[Create Question]'
|    [Disabled]
|    Actions = [OnClick, SetTextSubstitution, ShowTextSubstitution, ClearTextSubstitution, GetTextLayoutResult]
|    MergeDescendants = 'true'
|-Node #5 at (l=0.0, t=210.0, r=1080.0, b=378.0)px
| IsTraversalGroup = 'true'
|-Node #8 at (l=22.0, t=242.0, r=127.0, b=347.0)px
| Role = 'Button'
| Focused = 'false'
| ContentDescription = '[Back]'
| Actions = [OnClick, RequestFocus]
| MergeDescendants = 'true'
|-Node #11 at (l=337.0, t=257.0, r=743.0, b=331.0)px
    Text = '[Create Question]'
    Actions = [SetTextSubstitution, ShowTextSubstitution, ClearTextSubstitution, GetTextLayoutResult]
그 결과, 위와 같이 Create Question이라는 텍스트로 노드를 가져올 경우, 문제 생성 버튼 뿐만 아니라 상단의 AppBar 속 텍스트도 동일한 텍스트를 가진다는 것을 확인할 수 있었다. 따라서 해당 텍스트를 가지며 clickAction이 존재하는 버튼 노드를 가져오기 위해서 다음과 같이 추가 필터링을 적용해 원하는 노드를 가져올 수 있었다.
    val buttonText = context.resources.getString(R.string.btn_create_question)

    val buttonNode = composeTestRule.onAllNodesWithText(buttonText) // 해당하는 모든 노드를 가져온 후
        .filter(
            hasClickAction(), // clickAction을 가지고 있는지 추가 필터링 적용
        ).onFirst()

    if (isEnabled) {
        buttonNode.assertIsEnabled()
    } else {
        buttonNode.assertIsNotEnabled()
    }
만약 하나의 조건에 해당하는 노드가 여러개 존재한다면 단일 노드를 가져오는 onNode와 같은 api를 활용할 경우, 조건을 만족하는 첫 번째 노드가 항상 반환이 되게 된다. 따라서 그 뒤에 존재하는 노드들은 아무리 조건을 만족하더라도 첫 번째 노드에 가려져 선택되지 않게 된다.
이럴 경우에는 위와 같이 모든 노드를 가져와 추가 필터링을 적용하거나, 하나의 노드만을 특정할 수 있는 조건을 적용해야 한다.
트러블 슈팅 2) 분명 있는데 없는 노드?🤔
객관식 문제 출제 화면에 대해서도 다양한 경우에 문제 출제 버튼이 활성화되는지 확인하기 위한 테스트를 작성하였다.
하지만 객관식 문제 출제 화면에 대해 버튼의 활성화 여부를 테스트하는 모든 테스트 케이스에 대해서 문제 생성 버튼의 노드가 시맨틱 트리에 존재하지 않는다는 오류를 만나게 되었다.
우선 버튼의 활성화 여부를 확인하는 로직이 여러 테스트 케이스에서 반복돼 이 또한 하나의 함수로 만들어 코드를 재사용 하였다.
private fun assertCreateQuestionButtonEnableValue(isEnabled: Boolean) {
    val buttonText = context.resources.getString(R.string.btn_create_question)
    val buttonNode = composeTestRule.onAllNodesWithText(buttonText)
        .filter(
            hasClickAction(),
        ).onFirst()

    if (isEnabled) {
        buttonNode.assertIsEnabled()
    } else {
        buttonNode.assertIsNotEnabled()
    }
}
그리고 이를 활용해 객관식 문제 출제 화면에서 버튼 활성화 여부를 체크하는 하나의 테스트 코드와 발생한 에러이다.
@Test
fun 일반_문제_생성_시_객관식_문항에_공백이_있으면_문제_생성이_불가하다() {
    val generalQuestionIndex = 0
    val newCreateQuestionUiState = baseCreateQuestionUiState.copy(
        selectedQuestionTypeIndex = generalQuestionIndex,
        choiceQuestionCreationInfo = baseChoiceQuestionCreationInfo.copy(
            choices = listOf("choice1", "choice2", "choice3", ""),
        ),
    )
    setCreateQuestionScreen(newCreateQuestionUiState)
    assertCreateQuestionButtonEnableValue(false)
}
에러 발생!🚫
java.lang.AssertionError: Failed to assert the following: (is not enabled)
Can’t retrieve node at index ‘0’ of ‘(Text + EditableText contains ‘Create Question’ (ignoreCase: false)).filter(OnClick is defined)’
이번에도 마찬가지로 printLog()을 활용해 정말 해당 노드가 없는지 확인하는 시간을 가졌다.
|-Node #21 at (l=912.0, t=1689.0, r=1038.0, b=1815.0)px
| Focused = 'false'
| Role = 'Button'
| ContentDescription = '[AI Quiz Creation]'
| Actions = [OnClick, RequestFocus]
| MergeDescendants = 'true'
|-Node #5 at (l=0.0, t=210.0, r=1080.0, b=378.0)px
    IsTraversalGroup = 'true'
    |-Node #8 at (l=22.0, t=242.0, r=127.0, b=347.0)px
    | Role = 'Button'
    | Focused = 'false'
    | ContentDescription = '[Back]'
    | Actions = [OnClick, RequestFocus]
    | MergeDescendants = 'true'
    |-Node #11 at (l=337.0, t=257.0, r=743.0, b=331.0)px
        Text = '[Create Question]'
        Actions = [SetTextSubstitution, ShowTextSubstitution, ClearTextSubstitution, GetTextLayoutResult]
하지만 이전 상황에서 출력했던 semantic tree와는 다르게 진짜로 Create Question text를 가지는 button이 semantic tree내 존재하지 않았다.
분명 화면에는 존재하는데 왜 semantic tree에는 존재하지 않을까 한참을 고민하던 중.. 유레카! “LazyColum”과 관련해서 그 원인을 파악할 수 있었다!
1️⃣ 여기서 잠깐! LazyColumn / Row의 동작 방식에 대해 짚고 넘어가자!
LazyColumn / Row가 등장하게 된 배경은 무엇일까? 컨텐츠 길이를 알 수 없을 때 단순히 Column / Row를 활용한다면 화면을 구성하는 모든 것이 한번에 구성되기 때문에 성능적인 이슈가 발생할 수 있다.
그렇기 때문에 화면에서 보여지는 부분만 그려질 수 있도록 LazyColumn / Row가 등장해 많이 활용되고 있다.
2️⃣ 그렇다면 이제 원인을 파악하자!
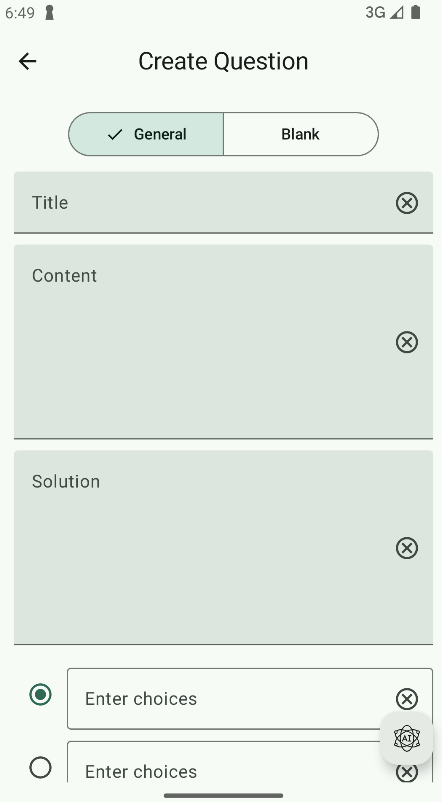
우선 객관식 문제 생성 화면이 딱 생성되었을 때와 스크롤 했을 때의 화면을 살펴보자!
| 초기 화면 | 스크롤 후 화면 |
|---|---|
 |
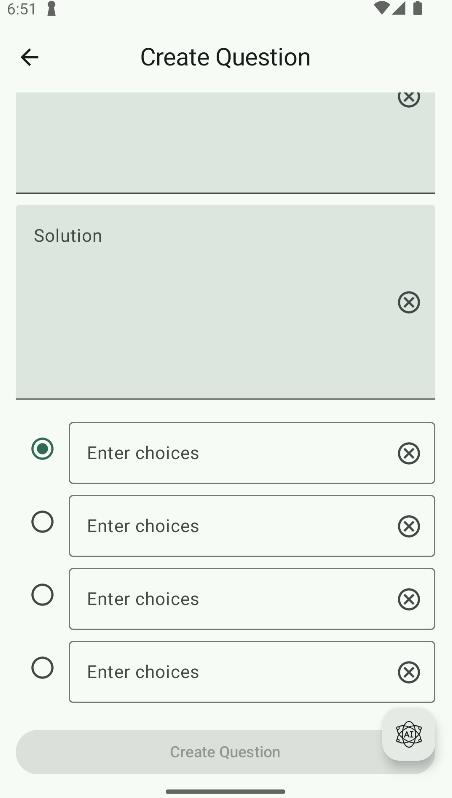 |
테스트 기기에 따라 초기화면에 보여지는 composable 구성이 달라지겠지만, 평소 내가 활용하는 애뮬레이터에서의 초기 화면과 스크롤 후 화면을 가져와봤다.
위 화면에서도 알 수 있듯이 객관식 문항 뒷 부분과 문제 생성 버튼은 초기 화면에 보여지지 않는다. 그리고 스크롤을 할 경우, 비로소 나머지 composable을 화면에서 볼 수 있게 된다.
그렇다면 스크롤 하기 전과 후 그려지는 semantic tree가 각각 어떻게 되는지 확인해봐야겠다! 그 전에 scroll이 가능한 Node를 특정 노드가 보여질 때까지 scroll할 수 있는 기능 또한 compose ui testing api에 존재한다.
// 문제 출제 버튼의 text
val createQuestionButtonText = context.resources.getString(R.string.btn_create_question)
// 문제 출제 버튼의 text가 보여질 때까지 scroll
composeTestRule.onNode(hasScrollAction())
    .assertExists()
    .performScrollToNode(
        hasText(createQuestionButtonText),
    )
그렇다면 이제 lazyColumn을 scroll 하기 전과 후의 semantic tree를 비교해보자!
1) 초기 상태 semantic tree
|  |-Node #125 at (l=42.0, t=2251.0, r=1038.0, b=2398.0)px
|    ContentDescription = '[choice item]'
|     |-Node #126 at (l=74.0, t=2283.0, r=137.0, b=2346.0)px
|     | Role = 'RadioButton'
|     | Focused = 'false'
|     | Selected = 'false'
|     | Actions = [OnClick, RequestFocus]
|     | MergeDescendants = 'true'
|     |-Node #127 at (l=168.0, t=2251.0, r=1038.0, b=2398.0)px
|       EditableText = ''
|       TextSelectionRange = 'TextRange(0, 0)'
|       IsEditable = 'true'
|       ImeAction = 'Done'
|       Focused = 'false'
|       Text = '[Enter choices]'
|       Actions = [GetTextLayoutResult, SetText, InsertTextAtCursor, SetSelection, PerformImeAction, OnClick, OnLongClick, PasteText, RequestFocus, SetTextSubstitution, ShowTextSubstitution, ClearTextSubstitution]
|       MergeDescendants = 'true'
|        |-Node #133 at (l=923.0, t=2273.0, r=1028.0, b=2378.0)px
|          Role = 'Button'
|          Focused = 'false'
|          ContentDescription = '[Clear Text]'
|          Actions = [OnClick, RequestFocus]
|          MergeDescendants = 'true'
|-Node #21 at (l=912.0, t=1689.0, r=1038.0, b=1815.0)px
| Focused = 'false'
| Role = 'Button'
| ContentDescription = '[AI Quiz Creation]'
| Actions = [OnClick, RequestFocus]
| MergeDescendants = 'true'
|-Node #5 at (l=0.0, t=210.0, r=1080.0, b=378.0)px
    IsTraversalGroup = 'true'
    |-Node #8 at (l=22.0, t=242.0, r=127.0, b=347.0)px
    | Role = 'Button'
    | Focused = 'false'
    | ContentDescription = '[Back]'
    | Actions = [OnClick, RequestFocus]
    | MergeDescendants = 'true'
    |-Node #11 at (l=337.0, t=257.0, r=743.0, b=331.0)px
        Text = '[Create Question]'
        Actions = [SetTextSubstitution, ShowTextSubstitution, ClearTextSubstitution, GetTextLayoutResult]
2) scroll 후 semantic tree
|  |-Node #125 at (l=42.0, t=1531.0, r=1038.0, b=1678.0)px
|  | ContentDescription = '[choice item]'
|  |  |-Node #126 at (l=74.0, t=1563.0, r=137.0, b=1626.0)px
|  |  | Role = 'RadioButton'
|  |  | Focused = 'false'
|  |  | Selected = 'false'
|  |  | Actions = [OnClick, RequestFocus]
|  |  | MergeDescendants = 'true'
|  |  |-Node #127 at (l=168.0, t=1531.0, r=1038.0, b=1678.0)px
|  |    EditableText = ''
|  |    TextSelectionRange = 'TextRange(0, 0)'
|  |    IsEditable = 'true'
|  |    ImeAction = 'Done'
|  |    Focused = 'false'
|  |    Text = '[Enter choices]'
|  |    Actions = [GetTextLayoutResult, SetText, InsertTextAtCursor, SetSelection, PerformImeAction, OnClick, OnLongClick, PasteText, RequestFocus, SetTextSubstitution, ShowTextSubstitution, ClearTextSubstitution]
|  |    MergeDescendants = 'true'
|  |     |-Node #133 at (l=923.0, t=1553.0, r=1028.0, b=1658.0)px
|  |       Role = 'Button'
|  |       Focused = 'false'
|  |       ContentDescription = '[Clear Text]'
|  |       Actions = [OnClick, RequestFocus]
|  |       MergeDescendants = 'true'
|  |-Node #140 at (l=42.0, t=1742.0, r=1038.0, b=1847.0)px // ⭐️ 새롭게 생긴 부분
|    Role = 'Button'
|    Text = '[Create Question]'
|    [Disabled]
|    Actions = [OnClick, SetTextSubstitution, ShowTextSubstitution, ClearTextSubstitution, GetTextLayoutResult]
|    MergeDescendants = 'true'
|-Node #21 at (l=912.0, t=1689.0, r=1038.0, b=1815.0)px
| Focused = 'false'
| Role = 'Button'
| ContentDescription = '[AI Quiz Creation]'
| Actions = [OnClick, RequestFocus]
| MergeDescendants = 'true'
|-Node #5 at (l=0.0, t=210.0, r=1080.0, b=378.0)px
    IsTraversalGroup = 'true'
    |-Node #8 at (l=22.0, t=242.0, r=127.0, b=347.0)px
    | Role = 'Button'
    | Focused = 'false'
    | ContentDescription = '[Back]'
    | Actions = [OnClick, RequestFocus]
    | MergeDescendants = 'true'
    |-Node #11 at (l=337.0, t=257.0, r=743.0, b=331.0)px
        Text = '[Create Question]'
        Actions = [SetTextSubstitution, ShowTextSubstitution, ClearTextSubstitution, GetTextLayoutResult]
두 semantic tree를 비교해본다면 scroll 후에 새롭게 문제 생성 버튼 Node가 생긴 것을 확인할 수 있다. 이와 같이 만약 LazyColumn을 활용하고 있다면 test할 대상이 현재 semantic tree에 존재하는지를 먼저 확인하자. 그리고 만약 존재하지 않는다면 scroll action을 활용해 해당 노드에 대한 semantic node가 생길 수 있도록 하자!
🔗 마무리하며
처음 compose ui test를 진행하며 다음 두 가지에 가장 많이 신경을 썼던 것 같다.
-
독립적인 test case 나누기 핵심적으로 테스트 해야 하는 시나리오를 정리하고 그에 맞춰 테스트 케이스를 작성하였다. 특히
일반 / 실시간 퀴즈,객관식 / 낱말 맞추기 문제각 상황을 분리해 테스트 케이스를 구분하였다. 함수 하나가 하나의 테스트 케이스를 확인할 수 있도록 테스트 함수를 독립적으로 구성하기 위해 노력하였다. -
테스트 할 대상을 선택하기 위해 적절히 semantic 추가하기
- 낱말 맞추기 문제를 생성할 경우, 빈칸과 텍스트 요소를 하나씩 추가할 수 있다. 그리고 추가된 요소들이 화면에 잘 나타나는지 확인하기 위해서 각 요소들을 대상으로 test를 진행해야 했다.
- 각 요소들은
Row로 감싸긴 아이템이기 때문에 Row 아이템 자체에contentDescriptionsemantic property를 새롭게 추가해 테스트에 사용하였다. - text / tag 등 다양한 방법 중에서도 contentDescription을 추가한 이유는 screan reader에서도 해당 요소들을 적절하게 인식하도록 하기 위해서 이다.
테스트하면서 내가 가장 유용하게 사용했던 것은 바로 printLog()를 통해 출력된 semantic tree이다. semantic tree를 확인하며 내 테스트 코드의 문제점을 보다 빠르게 확인할 수 있었던 것 같다.
최근 새롭게 Screenshot testing이라는 것이 등장해 여러 오픈소스에서 사용되는 것을 확인할 수 있었다. 지금처럼 직접 테스트 코드를 작성하고 어떻게 동작하는지 확인하는 것은 Behavior ui test의 방식 중 하나이다. screenshot testing은 직접 test 코드를 작성할 필요없이 저장된 스크린샷을 바탕으로 테스트가 진행된다. 따라서 모든 케이스에 적용하기에는 용량이 많이 필요하다는 단점이 존재한다. 나의 경우, 모든 경우에서 가장 기본적으로 사용될 수 있는 testing api를 활용하는 방식 먼저 학습하게 되었다. 추후 일부 test에서는 screenshot testing 방식을 적용해 test의 간편함도 느껴보고 싶다.
댓글남기기